


Introduction
If you’re new to Laravel or to frameworks in general then you might be slightly overwhelmed the first time you run laravel new new-project in your development environment and see the file and folder structure it has created. Don’t worry though, because to begin with you’ll only need to focus on a few key files and folders, and we’ll go through what they’re for in this article.
Overview:
Laravel project architecture follows a model-view-controller (MVC) pattern, which essentially means the logic part of the application is separated from the user interface. This is done by utilising a “model” — the application data, which is displayed in a “view” — the user interface, which is updated by the “controller” — which makes calls on the model and the view to display the appropriate information.
In addition to this, Laravel has a lightweight templating engine, a powerful set of routing features, support for additional libraries and packages, the Eloquent ORM database query language, artisan command line shortcuts and testing tools.
So let’s take a look where we can find the files that we need to modify to make use of these features, we’ll use our Welcm Blog project from our previous article to go through the key files and folders.
Root:
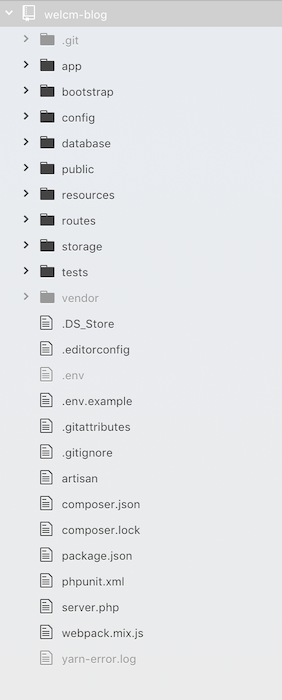
We’ll dive into the folders in a moment, but the key file at this level that you should be aware of from the start is the .env file, which will contain your database connection details, as well as other login details or API keys for third party services or email accounts. You also set your app URL, set the app debug level and specify the environment for the app, e.g. local, staging or production.
app/:
By default you should see a User.php file in this folder. This defines the default User model. Laravel deliberately does not create a Models folder due to the range of definitions of a “Model” in this context, leaving it up to the developer. See at the end of the article for a quick guide on how to set up a Models folder in your project if you’d prefer.
The model is usually a class with properties that match the columns in your database, and the relationship between models can also be defined within these files.
To create a model in Laravel, run this command in your terminal:
$ php artisan make:model ModelName
And an app/ModelName.php file will be generated.
You can create a database migration at the same time by adding -m to the end of the command (see database/ below).
We’ll take a look at the folders within the app directory next. Typically additional folders for Notifications, Mail, Transformers for API data and Event Listeners, to name a few will go in the app/ folder, but we’re going to skip everything in here for now except the app/Http/Controllers folder.
Controllers/:
This, unsurprisingly is where the Controller files live.
You can create a controller by running:
php artisan make:controller BlogController
You can add --resource after this command to create empty CRUD (create, read, update, delete) functions in the file.
You can create functions in the controller files that contain any logic you choose, but in we apps they’re commonly used to manipulate data and return a view.
To use a simpler version of the example from our Wink post, this function will simply return this view: resources/views/blog/index.blade.php:
public function index()
{
 return view(‘blog.index’);
}
You can then register a route (see the routes/web.php below) to access that function in your application.
For the time being, that’s all you need to know about the app/ folder, so let’s move on.
bootstrap/:
The bootstrap/ folder isn’t for Bootstrap CSS (although if you want to learn about Bootstrap CSS check out our getting started guide) but the app.php file that bootstraps (loads) the framework files, and also stores cached files for performance improvements. We don’t need to do anything in here for now.
config/:
When getting started with Laravel, there isn’t much to change within the config/ folder, but it’s good to know where the config files are if you need to change anything. If you’ve installed a third party package and you need to publish the config file you can usually find the command in the readme but it will be something like:
php artisan vendor:publish — provider='Provider\Name' — tag="config"
This will copy the config file into the config/ folder for you to edit.
database/:
In the database/ folder you’ll find a migrations/ folder, this is where files are created when you need a migration file for modifying the database structure of your project. Run the following to create a migration file:
php artisan make:migration --table='table' 'description_of_migration'
This will then be created in your database/migrations/ folder. Edit the file to make the necessary changes (check out the 2014_10_12_000000_create_users_table.php file in database/migrations/ for a handy example), then when you run:
php artisan migrate
This folder will be checked for pending migrations files that have not yet been run and run them, and update your database accordingly.
public/:
These are the files and folder that will sit in the public folder on your web server when a project is deployed.
You can add and reference your own images, css, javascript etc within this folder. When deploying a site, check the paths in index.php are correct that point to your /vendor/autoload.php and /bootstrap/app.php files.
resources/:
In brief, the js/ and sass/ folders contain the uncompiled less, sass and javascript assets, and lang/ contains language files. We’ll skip over these for now and focus on just one folder, views/.
views/:
You should see a welcome.php file in this folder, this is the page you will see when you first navigate to “your-project.test”. You can create pages and template elements in their own folders within the views/ folder and either return these views directly from the routes/web.php file or from a controller file.
Laravel uses the blade templating engine, which is a simple yet powerful system that allows you to define sections in your views and easily inherit layouts from other files.
routes/:
For a simple web app, we’ll just look at the routes/web.php file, this is where you define the URLs for web requests for your app and route particular URLs to controllers in your application, or directly return a view.
You’ll see the default entry:
Route::get('/', function () {
   return view('welcome');
});
This returns the welcome view when you visitor the root URL of your app.
If you have, for example a blog controller app/Http/Controllers/BlogController.php, you can access the CRUD (Create, Read, Update, Delete) functions by simply adding a resource route to your routes/web.php:
Route::resource('/blog', 'BlogController');
You can specify particular functions in a controller (in this case the index() function mentioned in the Controllers/ section above) by using:
Route::get('/blog', 'BlogController@index');
storage/:
The main folder that might be useful from the start is the storage/logs folder. This contains any application logs if an error occurs and can be useful for debugging and troubleshooting. Since the overhaul to the logging system in Laravel 5.6, the default behaviour is that date stamped log files are created, making finding errors simpler than searching though single large laravel.log file.
tests/:
The tests/ folder is where you write and store all your automated test files. PHPUnit testing is supported and configured by default. You’ll see Feature and Unit folders within the tests folder.
To create a test in the Feature directory, run:
php artisan make:test UserTest
To create a test in the Unit directory, run:
php artisan make:test UserTest — unit
vendor/:
The final folder is the vendor/ folder — this contains all the dependencies installed by composer, as well as optional packages you may have installed. It’s important you don’t directly edit any files in here as future updates may cause errors in your app. You can publish assets from the vendor folder with a php artisan command, this is usually explained on the package’s git readme. This enables you to make changes without affecting the base vendor code.
Wrap up:
So that’s a brief look at all the files and folders you should be aware of when starting a new Laravel project. The type of project you are coding will influence how much time you spend in the various files and folders. Typically whilst getting started with a web app you’ll become quickly acquainted with the app/Http/Controllers/ and resources/views/ folders.
As this is a quick primer we haven’t covered all the files and functions, such as Middleware or Exception handling, but hopefully this will help you not only to understand what the key files and folders do but also appreciate the thought that has gone into the structure of a Laravel project to keep everything organised.
Footnote: Creating a Models folder for your model files.
If you prefer to store your model files in a Models folder then you’ll need to do the following:
In each of your model files (e.g. app/User.php), change
namespace App;
to
namespace App\Models;
Then in the following files
app/Http/Controllers/Auth/RegisterController.phpconfig/auth.phpconfig/services.phpdatabase/factories/ModelFactory.phpdatabase/factories/UserFactory.php- Your Controller files, e.g.
app/Http/Controllers/BlogController.php
Change App\ModelExample to App\Models\ModelExample
Then you should be good to go.