


Introduction
During the development of any project that involves storing or manipulating information there are times when having realistic “dummy” data is very helpful.
Dummy data can be useful for testing your database structure, your user interface or export functions within your app. It can also be used when stress/load testing your application, and also for debugging an existing project where you do not wish to use real user data.
If your web application stores user details you can of course manually add some data through the UI (although the task of making up names quickly becomes repetitive, then leads to keyboard mashing and messages like “Welcome, Adsdsfgg Zncejdjde” in your application). You could of course import directly to the application database, by creating an SQL import file, or even hardcode some manually created dummy data into a seed function.
None of these are ideal, or necessary though, because Laravel comes with an essential PHP library called Faker.
Faker Overview
Faker generates fake or dummy data for your application and has built-in capability to generate fake data of the following types:
- Base
- Lorem Ipsum Text
- Person
- Address
- Phone Number
- Company
- Real Text
- Date and Time
- Internet
- User Agent
- Payment
- Color
- File
- Image
- Uuid
- Barcode
- Miscellaneous
- Biased
- Html Lorem
We won’t go through this list in this article, the best thing to do is check the Faker documentation for a full explanation of what each of these produces and the available formatting options.
On the subject of formatting options, each of the above list are known as “providers”, and have a range of “formatters” available, for example the “person” provider has the following range of formatters to output specific items to match the requirements of your application:
title($gender = null|'male'|'female')     // 'Ms.'
titleMale                                 // 'Mr.'
titleFemale                               // 'Ms.'
suffix                                    // 'Jr.'
name($gender = null|'male'|'female')      // 'Dr. Zane Stroman'
firstName($gender = null|'male'|'female') // 'Maynard'
firstNameMale                             // 'Maynard'
firstNameFemale                           // 'Rachel'
lastName                                  // 'Zulauf'
Faker also has a selection of Modifiers to further customise the output, these are: unique(), optional(), and valid().
unique() is pretty self explanatory — it will only output unique values, so to use the example from the Faker GitHub:
// unique() forces providers to return unique values
$values = array();
for ($i=0; $i < 10; $i++) {
  // get a random digit, but always a new one, to avoid duplicates
  $values []= $faker->unique()->randomDigit;
}
print_r($values); // [4, 1, 8, 5, 0, 2, 6, 9, 7, 3]
If the output cannot be unique (e.g. if we were to use randomDigitNotNull (this generates a single digit between 1 and 9), to create 10 values, Faker will throw an exception as there are only 9 unique numbers available.
optional() will randomly return a default value — you can specify what the default value is and the probability of it occurring, again to use the Github example:
$faker->optional($weight = 0.9, $default = 'abc')->word; // 10% chance of 'abc'
valid() only accepts values that pass the validator function, as in the following example that checks that the output divided by 2 results in an integer (any whole number):
// valid() only accepts valid values according to the passed validator functions
$values = array();
$evenValidator = function($digit) {
	return $digit % 2 === 0;
};
for ($i=0; $i < 10; $i++) {
	$values []= $faker->valid($evenValidator)->randomDigit;
}
print_r($values); // [0, 4, 8, 4, 2, 6, 0, 8, 8, 6]
In a similar way to unique(), if Faker cannot generate a valid value it will throw an exception.
Localisation
We can create localised fake data simply by specifying the locale when creating the Faker, for example:
$faker = Faker\Factory::create('fr_FR');
Since Laravel 5.2 the locale can also be configured in your /config/app.php file, find the faker_locale section and update, for example:
'faker_locale' => 'fr_FR',
Seeds
You may wish to generate the same fake data whenever the faker command is run — this can be useful for unit testing or populating a demo app with consistent data. Faker has a seed() function that means using the same seed will generate the same data. Simply specify the seed when creating the Faker, for example:
$faker = Faker\Factory::create();
$faker->seed(1234);

echo $faker->name; // 'Jess Mraz I';
Using Faker in Laravel
Faker is pre-installed in Laravel since version 5 so as long as php artisan --version is ≥ 5.0 we don’t need to do worry about any composer commands to get started.
The simplest way to quickly test some functions of the Faker library is to just return some data straight from your web routes file — this is only for testing purposes, we’ll look at better ways of implementing Faker in your project later in this article.
(Using closures directly in your route files isn’t recommended as it prevents you from caching your routes file when you go to production.)
For this purpose however, we use this method to try out some Faker functions quickly:
In your routes/web.php file, add the following:
Route::get('/fakertest',function(){
$faker = Faker\Factory::create();
$limit = 10;
for ($i = 0; $i < $limit; $i++) {
echo nl2br ('Name: ' . $faker->name . ', Email Address: ' . $faker->unique()->email . ', Contact No: ' . $faker->phoneNumber . "\n");
}
});
Then visit yourproject.test/fakertest in your browser and you should see something like the following:
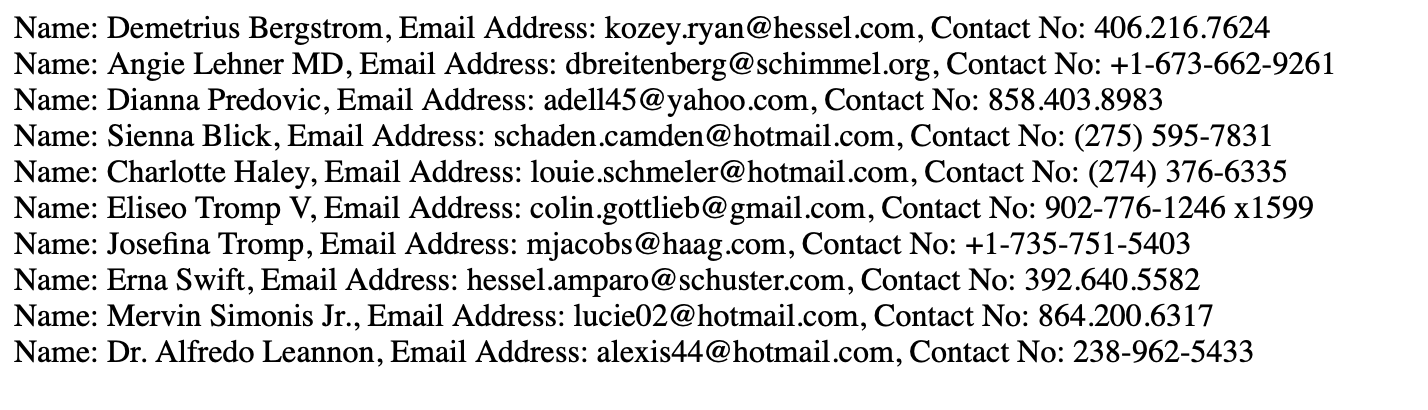
Note every time you refresh the view a different set of data will be generated.
If you need hosting for your Laravel projects, we like DigitalOcean, you can get $100 hosting credit to try it out if you sign up via this link.
You can modify the code above to try out some of the above features, for example modifying the above code to the following
Route::get('/fakertest',function(){
    $faker = Faker\Factory::create('fr_FR');
    $faker->seed(1234);
$limit = 10;
    for ($i = 0; $i < $limit; $i++) {
      echo nl2br ('Name: ' . $faker->firstNameFemale . ', Email Address: ' . $faker->unique()->email . ', Contact No: ' . $faker->phoneNumber . "\n");
    }
});
We’ve specified a language and a seed when creating the Faker, and specified Name should be firstNameFemale, which results in the following:
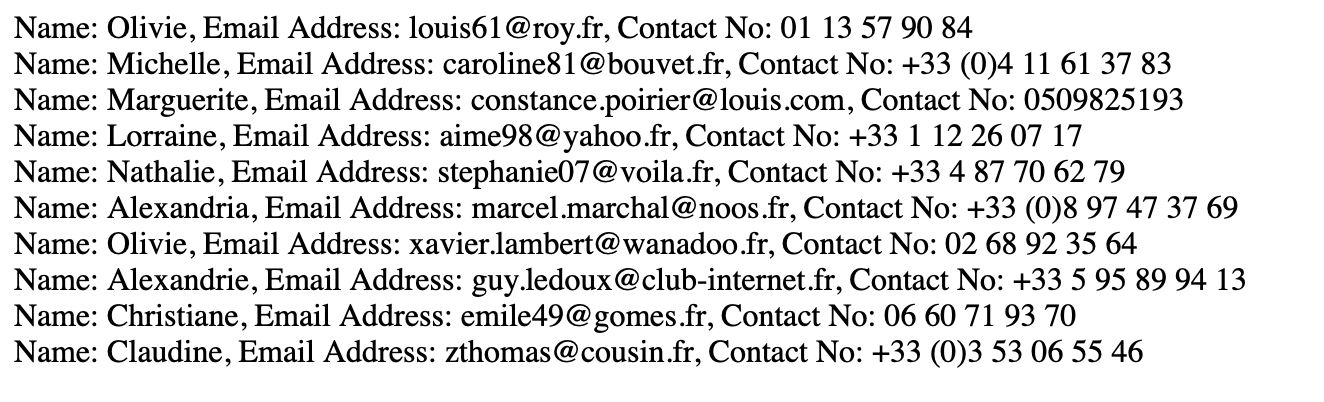
Note that as a seed() is specified, refreshing the view will still display the same data.
This is helpful for testing Faker’s functions, but if you’re using it in a project to generate data it’s recommended that we use Model Factories and Seeders to accomplish this.
Faker, Model Factories and Seeders
In your Laravel project in /database/factories/ you’ll find a file called UserFactory.php that contains example code for creating dummy data for users. You can add other factory definitions to this file or create new files to keep the structure more organised.
Let’s say we want to seed our application with some dummy visitor data and in our application we’ve already created the Visitor model, set up a VisitorController, and run the necessary database migration so we have name, email and company columns in the visitors table in the database for which we want to create data.
Seeders
We need to create a Visitor seeder, so we use the following command:
php artisan make:seeder VisitorTableSeeder
This will create /database/seeds/VisitorTableSeeder.php
We’ll add some code to this file in a moment but first let’s update the /database/seeds/DatabaseSeeder.php file so it can run our new seed. Update the run() method to the following:
public function run()
{
 $this->call(VisitorTableSeeder::class);
}
You can add multiple seeds to the call method by adding them to an array like this:
public function run()
{
    $this->call([
        VisitorTableSeeder::class,
        DeliveryTableSeeder::class,
        StaffTableSeeder::class,
    ]);
}
Now in our VisitorTableSeeder.php file we update the run() method as follows:
public function run()
{
 factory(App\Visitor::class, 5)->create();
}
This will create 5 Visitor records when the seed method runs, adjust the number to fit your requirements.
Model Factories
Now let’s create the Model Factory, run:
php artisan make:factory VisitorFactory --model="App\\Visitor"
You’ll see a /database/factories/VisitorFactory.php has been created.
Update the contents as follows:
$factory->define(App\Visitor::class, function (Faker $faker) {
 return [
    'name' => $faker->name,
    'email' => $faker->email,
    'company' => $faker->company
 ];
});
If you need to use the seed() method for generating consistent data you can add the following line above this code:
$factory->faker->seed('1234');
Important! You may need to use the following command to re-generate the list of classes in your app before the database seed will run:
composer dump-autoload
Now we’re ready to create some data! Run
php artisan db:seed
You should see the following:
Seeding: VisitorTableSeeder
Database seeding completed successfully.
Now you should have your faker-generated dummy data in your database! ? The php artisan db:seed command will seed data for any Classes specified in the run() function of your DatabaseSeeder.php file, if you want to only seed data for a particular Class you can use the following command:
php artisan db:seed --class=UsersTableSeeder
That’s pretty much it for the basics of getting useful, realistic dummy data into your applications using Factories and Seeders. We hope you’ve found the article helpful.
There’s a lot more to this functionality once you have the basics working. One useful feature is creating dummy data with relationships, for example if we wanted to create 10 staff and 3 visitors associated with each of those of staff members. Please do get in touch if you’d like us to cover this in a future post.